Making a Pandanus Leaf Mat - Part 1
- J.I.M. Kendall
- Feb 29, 2020
- 8 min read

Part One - Preparing the leaves for weaving
Pandanus leaf mat making is an old art form here in Vanuatu and is an important part of the culture. Vanuatu is a floor orientated culture where most of your daily living activities will be on the ground. A typical household in any rural area is going to use mats as the ground coverings. For instance, meals are taken in a family kitchen which may or may not have a raised platform and mats are placed on the platform and / or the ground for people to sit on. Mats are grabbed anytime you want to sit down on the ground and provides a comfortable spot to sit. In kustum culture, mats are an important part of gift giving from our 'Good by Kakai' party in the training village to 'welcome home' gifts for family members. When a marriage is being arranged and the goods for the new couple are being negotiated, the number of mats decided on are a sign of wealth and rank right up there with the number of pigs given. I went to one wedding for three couples and 90 mats were given as presents.


So how do you make a pandanus leaf mat? To start, you need pandanus trees. After harvesting the leaves, you dry them, straighten and cut them, dye some different colors, and then weave them together in a nice pattern. Easy-peasy. In part one of this essay I will cover preparing the leaves for weaving. In part two I will cover weaving the mats.
I’ve been learning how to weave from my work counterpart, Ruth, who is an exceptional mat weaver. To get my raw materials, I have been harvesting from the trees of different families around town. It is customary to simply give you the leaves if there is a family connection between you. Then in the course of just daily life, at some point I would have something they would want or need so I would reciprocate. So for example, for Sangri and his family I have harvested twice from his trees and have given him a mat in return.
Harvesting:
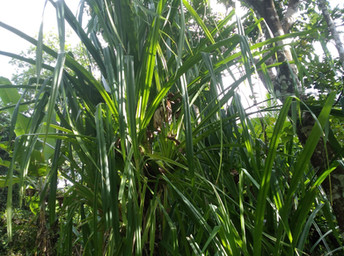
The pandanus tree looks like it is of the grass family. Think corn stalk leaves, now imagine that much bigger and on a busy kind of tree. Pandanus trees look like something out of a Dr. Suesse book. The basic anatomy of the leaf is two sided separated by a center spine. The end closest to the trunk in harder and woodier. The leaf descends down into a tip.
Harvesting the leaves is simple but sweaty because you are in a jungle. You simply get in there and cut the leaf away from the trunk of the tree. I am often asked if America also has pandanus trees, to which I replay maybe Florida or Hawaii does, but a jungle tropical climate like Vanuatu is not common in the continental U.S.


Stage One: Drying out the leaves
Once you get the leaves back to your house, you then prepare them for their initial steaming / heating to kick start the drying process. You can boil, place in a bread oven, or cover in hot stones similar to cooking laplap to heat up the leaves. This breaks down something inside of the leaves, perhaps the fiber, which speeds up the drying process. Out of curiosity I harvested some leaves and then just put them out in the sun directly to see how long the drying time would be. In about three weeks the leaves were not close to being dry and were in fact starting to get kind of gross with mildew. With a kick start to the process the drying time is about a week.
The difference in technique between boiling, oven, and laplap stones is personal preference and what you have available. Then, based on the kick start method you use will determine how you roll up the leaves in bundles. In the main, the first thing you do is remove the spine from the leaves. You can do this by cutting it out with a knife or by using your hands to rip it out. If your leaves are smaller, more flexible, they could potentially be rolled up with out cutting out the spine. By the end of the process, the spine of the leaf is removed. Either you do it at the beginning allowing you to more easily roll up the leaves with out breaking them or you do it at the end of the process when you are trimming down the leaf. I’ve noticed a lot of the women here leave the spine in until the end. But I’d don’t get the same kind of nice, no broken leaf roll out of my leaves unless I cut the spine out.
Once you've selected your 'kick-start' method and whether or not you take out or leave in the spine, next on the to-do list is roll up the leaves. Grab a handful of leaves and simply roll them into a packet. If it’s a pot of hot water then your bundle needs to be small enough to fit inside. If it is the bread oven or the stones, you can make your bundle larger. The larger the bundle the fewer bends in the leaves and the fewer opportunities of the leaves breaking. Tie up the bundles with any spare pieces of old dry strips from other projects or the spine if you had cut it out.
Now you place the bundles into the 'kick-start' method of your choice. It only needs to be in the water for five minutes. Putting the leaves into the bread oven can potentially make them dry all the way through but that would require baby sitting them and moving them around until every part is dry. I have not done it this way. Instead I have dropped off bundles to the bread oven on a day when it is being used and then pick up the leaves later. If I had the chance, I would undo the bundles, loosening the leaves as they go into the oven and then move them about until they get good and dried out.
The final method is to heat up a bunch of stones like your about to make laplap. Then bury the bundles of leaves into the hot stones. Pull them out when it is cool. I like this method simply because it is one I can do at my home. A tip is to make sure your bundle is not too dense so that the leaves can heat up all the way through. Also, you can be cooking at the same time such as actually making laplap or baking in a cast iron pot.
After the 'kick-start' method the leaves then get put out into the sun to finish drying out. Grab a handful, tie the tips together, and in my case, hang them up on the clothes line. Let them get as much sun as possible for about a week. Take then into shelter at night to protect them from night rain and the dew as well as anytime it rains. My area is very wet and everything molds. The leave, too, will mold making it dark and not nice.


Stage Two: Straightening and cutting
At this point the leaves have begun to curl up into themselves. So when they reach the point of being tan and papery to the touch then they are ready to be rolled. Simply take the leaf and roll it around your hand straightening it out as you go. Give the roll a nice tight tug or twist. Once you have a bunch done, tie the tip ends back together and set out in the sun. If there is no sun, set them where they have some shelter from the rain but can still get air on them. If the leaf is holding the spiral then it is at a good point of dryness. From here you continue to give the leaves as much sun and wind as possible to continue the drying process and to bleach them. The more white your strips are the higher quality they are.
Once all of my leaves have been rolled and tied into spiral bundles, I then go back through them s and work on straightening them with a knife. Using the back edge of the blade run the blade from base to tip both front and back. This pulls off the first layer of ‘skin’ and reveals some of the nice whiteness underneath. It is also making the leaf flat and straight. As you work through your leaves, make sure the ones you are not working on are in the sun getting bleached and dry.
Once you judge the leaves to be straight, dry, and bleached white then you can begin cutting the strips. Starting about one foot down from the top of the base, cut out small slits where you want your strips to be. I use my forearm as my reference length. Then using the back of the knife cut down the length of the leaf towards the tips. A typical leaf can be cut into two or three strips depending on the width of the leaf and on the width of your strips.
Also at this time you can begin trimming the edges of the strips. Both edges should be trimmed the entire length of the leaf. This creates clean edges which is important for a good looking mat. You want to try and cut as close to the raw edge as possible when making your cut edge so as to preserve as much leaf as possible. After I roll them back up again, tie together the wooden, uncut ends into a bunch and hang them out for more bleaching in the sun.
Strip width is going to be the most important factor for determining the quality of the finished product. A mat with even strips will be squared, will have straight edges, and a clean pattern. A mat with unevenly width strips will have an unattractive wave look to it and the pattern will also show an odd wave to it. Most mats have their strips cut out at 1 cm width. A thin, delicate mat will have strips of about 0.5 cm. And a fat strip mat can be 1.5 - 2 cm. With practice you can eyeball the size of your strips as you cut them. Needless to say, an experienced mat maker can eyeball all their leaves into even-steven strips.
For dying the strips, this can be done either before or after cutting the strips. But since I find that the process tends to make the leaves curls I like to dye first and cut after. You get a pot or a large kettle, fill it with water and add powder dye. Or usually you grab your left over dye and add water and powder as needed until you achieve the color you want. Bring the dye to a simmer, add the strips, saturate thoroughly, and then remove strips from the liquid. Place in the sun to dry.
The key to a really good dye job is the heat of the dye liquid. Keep the pot on the heat at a simmer. I discovered this when I was trying to use my cooking propane stove. My bush kitchen is currently in disrepair so I cook inside of my house. But I don't want to get dye everywhere in my kitchen nook so I heat up the dye liquid and then take the pot outside. I have found that as the water cools even a little the dye job becomes less and less quality.
And there we are, the strips are prepared for weaving. They should all be paper dry, edges trimmed, cut into strips of even width, and the appropriate number dyed the color you want. Now you are ready to start weaving.
